
HOMER
Software for motif discovery and next-gen sequencing analysis
Visualizing Experiments with a Genome Browser
The
UCSC Genome Browser is
quite possibly one of the best computational tools ever
developed. Not only does it contain an incredible
amount of data in a single application, it allows users to
upload custom information such as data from their ChIP-Seq
experiments so that they can be easily visualized and
compared to other information. There are also other
genome browsers that are available, and each has a different
strength:UCSC Genome Browser
Truly a unique resource, logs of data preloaded and annotations.WashU Epigenome Browser
Capable of visualizing long-range interactions (great for data sets like Hi-C), also has a lot of preloaded data.IGV
The Integrated Genomics Viewer (IGV), great for looking at reads locally instead of needing to load them to a server/cloud based solution. Great for directly looking at sorted bam/bai files to examine mutations in reads.
Most of the tools that are part of HOMER cater to the
strengths of the UCSC Genome Browser - however, the
bedGraph and other files generated by HOMER can be
normally be used in the other genome browsers as well.
Making Genome Browser Files
The basic strategy HOMER
uses is to create a bedGraph formatted file that can then
be uploaded as a custom track to the genome browser.
This is accomplished using the makeUCSCfile program. To make a ucsc
visualization file, type the following:
makeUCSCfile <tag directory> -o auto
i.e. makeUCSCfile PU.1-ChIP-Seq/ -o auto
(output file will be in the PU.1-ChIP-Seq/ folder named PU.1-ChIP-Seq.ucsc.bedGraph.gz)
i.e. makeUCSCfile PU.1-ChIP-Seq/ -o auto
(output file will be in the PU.1-ChIP-Seq/ folder named PU.1-ChIP-Seq.ucsc.bedGraph.gz)
The "-o auto" with make the
program automatically generate an output file name (i.e.
TagDirectory.ucsc.bedGraph.gz) and place it in the tag
directory which helps with the organization of all these
files. The output file can be named differently by
specifying "-o outputfilename" or by simply omitting "-o",
which will send the output of the program to stdout (i.e. add "
> outputfile" to capture it in the file
outputfile). It is recommended that you zip the file
using gzip and
directly upload the zipped
file when loading custom tracks at UCSC.
To visualize the experiment in the UCSC Genome Browser, go to Genome Browser page and select the appropriate genome (i.e. the genome that the sequencing tags were mapped to). Then click on the "add custom tracks" button (this will read "manage custom tracks" once at least one custom track is loaded). Enter the file created earlier in the "Paste URLs or data" section and click "Submit".
To visualize the experiment in the UCSC Genome Browser, go to Genome Browser page and select the appropriate genome (i.e. the genome that the sequencing tags were mapped to). Then click on the "add custom tracks" button (this will read "manage custom tracks" once at least one custom track is loaded). Enter the file created earlier in the "Paste URLs or data" section and click "Submit".
Problems Loading UCSC Files
The most common problem
encountered while loading UCSC files is to see "position
exceeds chromosome length" or something to that
effect. This is usually caused by one of two
problems:
1. You are trying to load
the file to the wrong genome assembly. Make sure
the assembly is correct!
2. Some of your tags are mapping outside the reference chromosome - this can be caused by mapping to non-standard assemblies or by some alignment programs. To remove all reads outside of the UCSC chromosome lengths, you can run the program removeOutOfBoundsReads.pl.
After running the program, you can rerun makeUCSCfile.
2. Some of your tags are mapping outside the reference chromosome - this can be caused by mapping to non-standard assemblies or by some alignment programs. To remove all reads outside of the UCSC chromosome lengths, you can run the program removeOutOfBoundsReads.pl.
removeOutOfBoundsReads.pl
<tag directory> <genome>
i.e. removeOutOfBoundsReads.pl PU.1-ChIP-Seq/ mm9
i.e. removeOutOfBoundsReads.pl PU.1-ChIP-Seq/ mm9
After running the program, you can rerun makeUCSCfile.
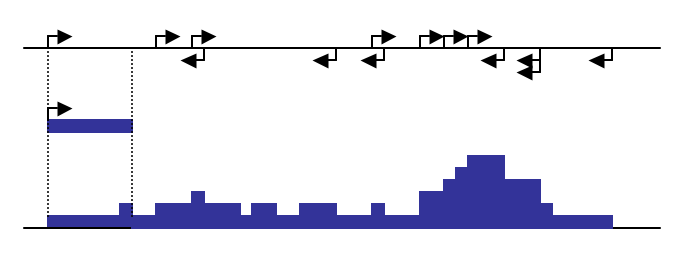
What does makeUCSCfile do?
The program works by
approximating the ChIP-fragment density at each position
in the genome. This is done by starting with each
tag and extending it by the estimated fragment length
(determined by autocorrelation,
or it can be manually specified using "-fragLength
<#>"). The ChIP-fragment density is then
defined as the total number of overlapping fragments at
each position in the genome. Below is a diagram that
depicts how this works:
As great as the UCSC Genome Browser is, the large size of recent ChIP-Seq experiments results in custom track files that are very large. In addition to taking a long time to upload, the genome browser has trouble loading excessively large files. To help cope with this, the makeUCSCfile program works by specifying a target file size when zipped (default 50MB). In order to meet the specified target file size, makeUCSCfile merges adjacent regions of tag density levels by their weighted average to reduce the total number lines in the final bedGraph file. If you have trouble loading getting your file to load, try reducing the size of the file using the "-fsize <#>" option (i.e. "-fsize 2e7"). To force the creation of larger files, use a very large file size (i.e. "-fsize 1e50") - this will create a file that does not merge any regions and displays a "native" view of the data.
Tags can be visualized separately for each strand using the "-strand separate" option.
Changing the Resolution
By default, makeUCSCfile uses the "-fsize <#>"
option to determine how man reads to essentially "skip"
when making the output file. You can also manually
set the resolution.
In an effort to reduce the size of large UCSC files, one attractive option is to reduce the overall resolution of the file. By default, makeUCSCfile will make full resolution (i.e. 1 bp) files, but this can be changed by specifying the "-res <#>" option. For example, "-res 10" will cause changes in ChIP-fragment density to be reported only every 10 bp.
In an effort to reduce the size of large UCSC files, one attractive option is to reduce the overall resolution of the file. By default, makeUCSCfile will make full resolution (i.e. 1 bp) files, but this can be changed by specifying the "-res <#>" option. For example, "-res 10" will cause changes in ChIP-fragment density to be reported only every 10 bp.
Normalization of UCSC files
In order to easily compare
ChIP-fragment densities between different experiments, makeUCSCfile will
normalize density profiles based on the total number of
mapped tags for each experiment. As with other
programs apart of HOMER, the total number of tags is
normalized to 10 million. This means that tags from
an experiment with only 5 million mapped tags will count
for 2 tags apiece. The total of tags to normalize to
can be changed using the "-norm
<#>" option.
Normalizing files to Input
The paragraph above specifies how to normalize read densities based on the total number of reads. For some applications, particularly if studying organisms with small genomes, it is better to visualize the read density as a ratio relative to Input or IgG. Normally I would NOT recommend visualizing reads this way if the Input/IgG read coverage is sparse as this will cause trouble when calculating ratios. To normalize the experiment to a second tag directory, use the "-i <input tag directory>" option:
makeUCSCfile ExpTagDirectory/ -i InputTagDirectory -o autoAdditional parameters to control the normalized output:
-pseudo <#> : To avoid fluctuations in the ratio due to low coverage input, a pseudo count is added to the numerator and denominator when calculating the ratio (default: 5)
-log : report as a log ratio (default is a simple ratio)
-inputtbp <#> : set the maximum tags per bp considered in the input experiment
Separating data from different strands / RNA-Seq
You can specify that HOMER
separate the data based on the strand by using the "-strand <...>"
option. This is useful when looking at
strand-specific RNA-Seq/GRO-Seq experiments. The
following options are available:
-strand both : default behavior, for
ChIP-Seq/MNase-Seq etc.
-strand separate : separate data by strand, for RNA-Seq/GRO-Seq
-strand + : only show the positive strand (i.e. Watson strand) data
-strand - : only show the negative strand (i.e. crick strand) data
-strand separate : separate data by strand, for RNA-Seq/GRO-Seq
-strand + : only show the positive strand (i.e. Watson strand) data
-strand - : only show the negative strand (i.e. crick strand) data
RNA-Seq and Splicing:
HOMER does not fully support the visualization of spliced RNA-Seq reads. However, if you specify the "-fragLength given" option, HOMER will only visualize the reads from the 5' end of the read until the first splice site (or the end of the read). This will help make the read densities look nice a crisp over exons, but will not visualize parts of the read that are 3' from the first splice found in the read.
Creating bigWig files with HOMER
Some data sets of very
large, but you still want to see all of the details from
your sequencing in the UCSC Genome Browser. HOMER
can produce bigWig
files by running the conversion program for you (bedGraphToBigWig).
The only catch is that you
must have access to a webserver where you can
post the resulting bigWig file - this is because instead
of uploading the whole file to UCSC, the browser actually
looks for the data file on YOUR webserver and grabs only
the parts it needs. Slick, eh. Chuck uses this
all the time for big experiments.
Before even trying to make bigWigs, you must download the bedGraphToBigWig program from UCSC and place it somewhere in your executable path (i.e. the /path-to-homer/bin/ folder). This called directly by HOMER to create the BigWig files.Using the makeBigWig.pl Script
Before even trying to make bigWigs, you must download the bedGraphToBigWig program from UCSC and place it somewhere in your executable path (i.e. the /path-to-homer/bin/ folder). This called directly by HOMER to create the BigWig files.
Using the makeBigWig.pl Script
To make bigWig files
easier to generate, HOMER includes a program creatively
named "makeBigWig.pl"
that automates all of the steps below.
If you are visualizing strand specific data (i.e. RNA-Seq), specify "-strand". The -url and -webDir are the directories are the web URL directory and file system directory where the bigWigs will be stored, respectively. Recent changes to UCSC require that the chromosome sizes be specified exactly. If having trouble, the current version of HOMER has the option "-chromSizes <filename>" so that you can specify the sizes explicitly.
makeBigWig.pl <tag
directory> <genome> [special options]
[makeUCSC file options] -webDir /path-to-web-fold/
-url http://webserverURL/bigwigFold/
i.e. makeBigWig.pl PU.1-ChIP-Seq/ mm9 -webDir /var/www/bigWigs/ -url http://ChuckNorrisU.edu/bigWigs/
i.e. makeBigWig.pl PU.1-ChIP-Seq/ mm9 -webDir /var/www/bigWigs/ -url http://ChuckNorrisU.edu/bigWigs/
If you are visualizing strand specific data (i.e. RNA-Seq), specify "-strand". The -url and -webDir are the directories are the web URL directory and file system directory where the bigWigs will be stored, respectively. Recent changes to UCSC require that the chromosome sizes be specified exactly. If having trouble, the current version of HOMER has the option "-chromSizes <filename>" so that you can specify the sizes explicitly.
Making bigWigs from scratch
This is a quick
description of what HOMER is doing. To make a
bigWig, add the "-bigWig
<chrom.sizes file> -fsize 1e20"
parameters to your makeUCSCfile command. When
making a bigWig, you usually want to see all of the tag
information, so make sure the "-fsize" options is
large. You also need to specify an output file
using "-o
<bigwigfilename>" and also capture the
stdout stream using ">
trackfileoutput.txt". You can also use "-o auto". The
"trackfileoutput.txt" will contain the header
information that is uploaded as a custom track to
UCSC. Recently, changes to UCSC require that HOMER
know the exact size of the chromosomes when making the
file - these should be placed in a file
(<chrom.sizes> file). makeBigWig.pl and makeMultiWigHub.pl
will generate these files automatically by analyzing the
sequences in the genome directory.
After running the makeUCSCfile program with the bigWig options, you need to do the following:
After running the makeUCSCfile program with the bigWig options, you need to do the following:
- Copy the *.bigWig file to your webserver location and make sure it is viewable over the internet.
- Need to edit the "trackfileoutput.txt" file and enter the URL of your bigWig file (... bigDataUrl=http://server/path/bigWigFilename ...)
- Upload the "trackfileoutput.txt" file to UCSC as a
custom track to view your data.
For example:
makeUCSCfile <tag directory> -o auto
-bigWig <chrom.sizes file> -fsize 1e20 >
trackInfo.txt
i.e.
i.e.
makeUCSCfile
PU.1-ChIP-Seq/ -o auto -bigWig chrom.sizes -fsize
1e20 > PU.1-bigWig.trackInfo.txt
cp PU.1-ChIP-Seq/PU.1-ChIP-Seq.ucsc.bigWig /Web/Server/Root/Path/
** edit PU.1-bigWig.trackInfo.txt to have the right URL **
cp PU.1-ChIP-Seq/PU.1-ChIP-Seq.ucsc.bigWig /Web/Server/Root/Path/
** edit PU.1-bigWig.trackInfo.txt to have the right URL **
NOTE: As of now, a bigWig
file can only be composed of a single track - if you
want to separate the data by strands, do the following:
makeUCSCfile PU.1-ChIP-Seq/ -o
PU.1.positiveStrand.bigWig -bigWig
chrom.sizes -fsize 1e20 -strand + >
PU.1-bigWig.trackInfo.positiveStrand.txt
makeUCSCfile PU.1-ChIP-Seq/ -o PU.1.negativeStrand.bigWig -bigWig chrom.sizes -fsize 1e20 -strand - > PU.1-bigWig.trackInfo.negativeStrand.txt
cp PU.1.positiveStrand.bigWig PU.1.negativeStrand.bigWig /Web/Server/Root/Path/
cat PU.1-bigWig.trackInfo.positiveStrand.txt PU.1-bigWig.trackInfo.negativeStrand.txt > PU.1-bigWig.trackInfo.both.txt
** edit PU.1-bigWig.trackInfo.both.txt to have the right URLs for both the negative and positive strands **
Creating Multi-Experiment Overlay Tracks
UCSC has recently added the
option to create overlay tracks, where several bigWig
files can be viewed in the same space with the help of
transparent colors. The first example of this was
the Encode Regulation Track, which showed H3K4me1/3 data
from several cell types at the same time. This is
very useful for large-scale data sets will many different
experiments. In these cases it is just about
impossible to get them on the screen together.
To make a "multi-wig hub", as we will refer to them, you need to make sure you have the bedGraphToBigWig program from UCSC, and a working webserver to host your files. If you can handle bigWigs in the section above, you can make multi-wig hubs.
The HOMER program to handle multi-wig hubs is called makeMultiWigHub.pl. It works essentially the same way as the makeBigWig.pl script, however, the syntax is a little different. The basic usage is:
NOTE: make sure you use the UCSC genome (e.g. mm9) and not the masked, bastardized HOMER version (mm9r).
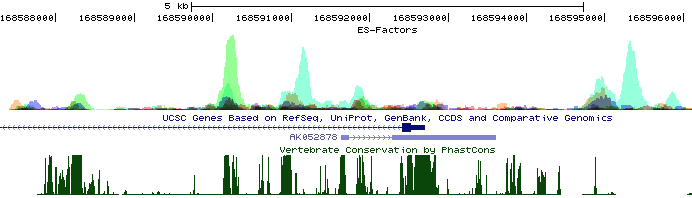
The above example will produce a hub called "ES-Factors", composed of configuration files and bigWig files, and place it on your server in the directory specified by "-webDir <directory>". It will also provide you with a URL to the hub (dependent on the value of -url <base url>"). To load the Hub, click on "Track Hubs" on the UCSC browser (next to custom tracks button), and paste the URL in to the dialog box. The example above will look something like this:
To figure out which factors correspond to which colors, click on the Blue Heading for the Hub in the settings area below the UCSC picture. Something like this should pop up:
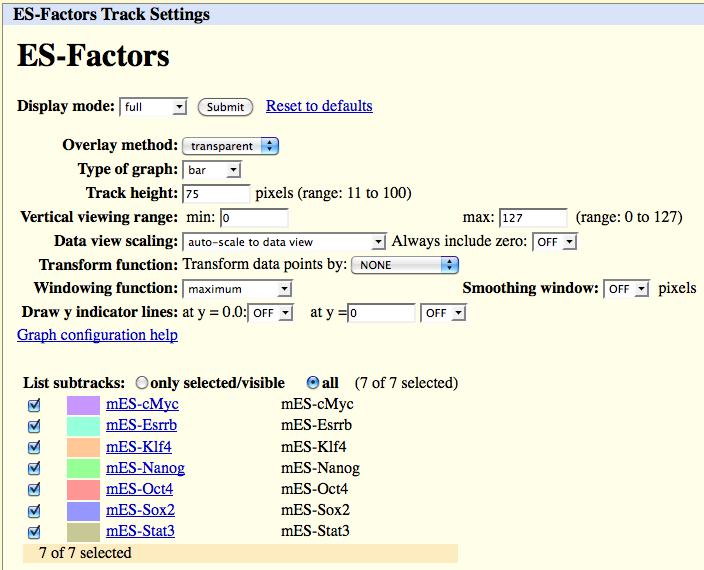
Unfortunately, as of now editing hub information can only be done by directly modifying the hub files on the server. For example, to edit to colors, you must edit the "/webserver/directory/hubName/genome/trackDB.txt" file.
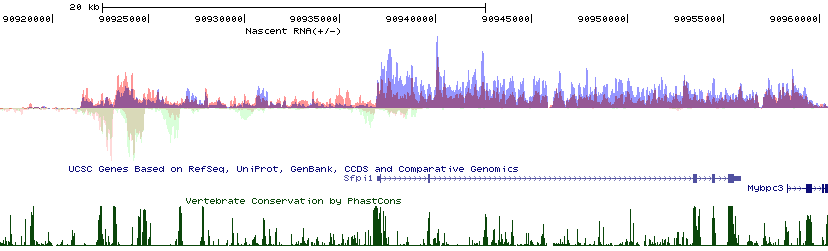
Because Hubs are so cool, HOMER will also do +/- strand RNA data right. Unfortunately, for now you can't mix stranded and non-stranded data in the same hub with the makeMultiWigHub.pl program. To visualize stranded information, add "-strand". Below is an example:
To make a "multi-wig hub", as we will refer to them, you need to make sure you have the bedGraphToBigWig program from UCSC, and a working webserver to host your files. If you can handle bigWigs in the section above, you can make multi-wig hubs.
The HOMER program to handle multi-wig hubs is called makeMultiWigHub.pl. It works essentially the same way as the makeBigWig.pl script, however, the syntax is a little different. The basic usage is:
makeMultiWigHub.pl <hub name>
<genome> [options] -d <tag directory1>
<tag directory2> ...
i.e. makeMultiWigHub.pl ES-Factors mm9 -d mES-Oct4/ mES-Sox2/ mES-Nanog/ mES-Klf4/ mES-Esrrb/ mES-cMyc/ mES-Stat3/
i.e. makeMultiWigHub.pl ES-Factors mm9 -d mES-Oct4/ mES-Sox2/ mES-Nanog/ mES-Klf4/ mES-Esrrb/ mES-cMyc/ mES-Stat3/
NOTE: make sure you use the UCSC genome (e.g. mm9) and not the masked, bastardized HOMER version (mm9r).
The above example will produce a hub called "ES-Factors", composed of configuration files and bigWig files, and place it on your server in the directory specified by "-webDir <directory>". It will also provide you with a URL to the hub (dependent on the value of -url <base url>"). To load the Hub, click on "Track Hubs" on the UCSC browser (next to custom tracks button), and paste the URL in to the dialog box. The example above will look something like this:
To figure out which factors correspond to which colors, click on the Blue Heading for the Hub in the settings area below the UCSC picture. Something like this should pop up:
Unfortunately, as of now editing hub information can only be done by directly modifying the hub files on the server. For example, to edit to colors, you must edit the "/webserver/directory/hubName/genome/trackDB.txt" file.
Because Hubs are so cool, HOMER will also do +/- strand RNA data right. Unfortunately, for now you can't mix stranded and non-stranded data in the same hub with the makeMultiWigHub.pl program. To visualize stranded information, add "-strand". Below is an example:
Examples of UCSC bedGraph files
The following shows what the
same data set looks like changing options for file size
(-fsize) and resolution (-res). Usually it's best to
use one or the other.
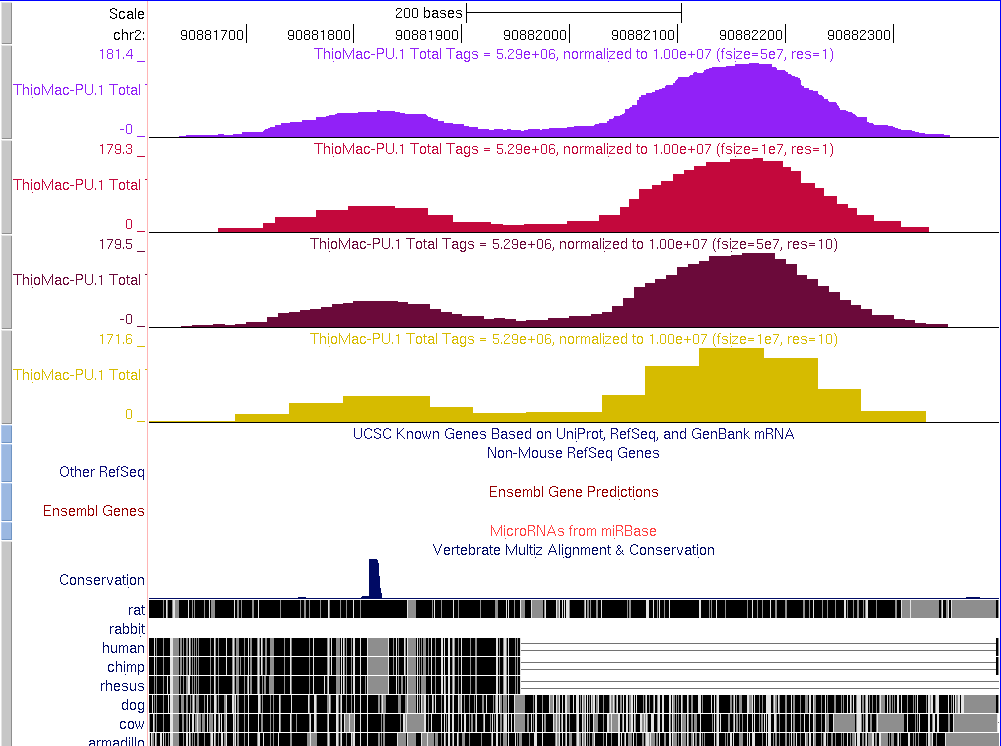
- -fsize 5e7 -res 1
- -fsize 1e7 -res 1
- -fsize 5e7 -res 10
- -fsize 1e7 -res 10
Command line options for makeUCSCfile
Usage: makeUCSCfile <tag directory> [options]Creates a bedgraph file for visualization using the UCSC Genome Browser
General Options:
-fsize <#> (Size of file, when gzipped, default: 5e7)
-strand <both|separate|+|-> (control if reads are separated by strand, default: both)
-fragLength <# | auto | given> (Approximate fragment length, default: auto)
-adjust <#> (Adjust edge of tag 3' by # bp, negative for 5', default: none[good for dnase])
-tbp <#> (Maximum tags per bp to count, default: no limit)
-res <#> (Resolution, in bp, of file, default: 1)
-avg (report average coverage if resolution is larger than 1bp, default: max is reported)
-lastTag (To keep ucsc happy, last mapped tag is NOT extended by default
Using this option will allow extending of data past the last tag position)
-norm <#> (Total number of tags to normalize experiment to, default: 1e7)
-noadj (Do not normalize tag counts)
-neg (plot negative values, i.e. for - strand transcription)
-CpG (Show unmethylated CpG ratios)
-color <(0-255),(0-255),(0-255)> (no spaces, rgb color for UCSC track, default: random)
-i <input tag directory> (normalize bedGraph to input data)
-pseudo <#> (Number of pseudo counts used to smooth out low coverage areas, default: 5)
-log (report log2 ratio instead of linear ratio)
-inputtbp (Maximum tags per bp to count in input, default: no limit)
-bigWig <chrom.size file> (creates a full resolution bigWig file and track line file)
This requires bedGraphToBigWig to be available in your executable path
Also, because how how bigWig files work, use "-strand -" and "-strand +"
in separate runs to make strand specific files: "-strand separate" will not work
Consider using makeBigWig.pl and makeMultiWigHub.pl if interested in bigWigs
-o <filename|auto> (send output to this file - will be gzipped, default: prints to stdout)
auto: this will place an appropriately named file in the tag directory
-name <...> (Name of UCSC track, default: auto generated)
-style <option> (See options below:)
chipseq (standard, default)
rnaseq (strand specific)
tss (strand specific, single bp fragment length)
dnase (fragments centered on tag position instead of downstream)
methylated (single bp resolution of cytosine methylation)
unmethylated (single bp resolution of unmethylated cytosines)
-circos <chrN:XXX-YYY|genome> (output only a specific region for circos[no header])
Command line options for makeBigWig.pl
Script for automating the process of creating bigWigs
Usage: makeBigWig.pl <tag directory> <genome> [special options] [options]
Special Options for bigWigs [choose one, don't combine]:
-normal (ChIP-Seq style, default)
-strand (Strand specific, for RNA-Seq and GRO-Seq)
-dnase (Special options for Crawford-lab style DNase-Seq)
-cage (Special options for CAGE/TSS-Seq)
-cpg (Special options for mCpG/CpG)
Other options:
Whatever options you want to pass to makeUCSCfile
!!Warning!!: do not try to specify "-strand separate" - use the special option above.
File options:
-fsize <#> (Use to limit the size of the bigwig files)
-url <URL> (URL directory -no filename- to tell UCSC where to look)
-webdir <directory> (name of directory to place resulting bigWig file)
-update (overwrite bigwigs in the webDir directory, otherwise random numbers are
added to make the file unique.
Current url target (-url): http://homer.salk.edu/bigWig/
Current web directory (-webDir): /data/www/bigWig/
You're going to want to modify the $wwwDir and $httpDir variables at the top of
the makeBigWig.pl program file to accomidate your system so you don't have to
specify -url and -webdir all the time.
Command line options for makeMultiWigHub.pl
Script for
automating the process of creating multiWig tracksUsage: makeMultiWigHub.pl <hubname> <genome> [options] -d <tag directory1> [tag directory2]...
Special Options for bigWigs [choose one, don't combine]:
-normal (ChIP-Seq style, default)
-strand (Strand specific, for RNA-Seq and GRO-Seq)
-dnase (Special options for Crawford-lab style DNase-Seq)
-cage (Special options for CAGE/TSS-Seq)
-cpg (Special options for mCpG/CpG)
Other options:
Whatever options you want to pass to makeUCSCfile
!!Warning!!: do not try to specify "-strand separate" - use the special option above.
Also, for the genome, do NOT use repeat version (mm9r) - use mm9 instead
File options:
-force (overwrite existing hub)
-fsize <#> (limit the file size of the bigwig files to this value)
-url <URL> (URL directory -no filename- to tell UCSC where to look)
-webdir <directory> (name of directory to place resulting hub directory)
Current url target (-url): http://biowhat.ucsd.edu/hubs/
Current web directory (-webDir): /data/www/hubs/
You're going to want to modify the $wwwDir and $httpDir variables at the top of
the makeMultiWigHub.pl program file to accomidate your system so you don't have to
specify -url and -webdir all the time.
Next: Finding Peaks (ChIP-enriched
regions) in the genome

Can't figure something out? Questions, comments, concerns, or other feedback:
cbenner@salk.edu